

Tying flies at home saves money, enhances angling experience.
You see a snaggy patch of water and realize that you might not get your fly back, but you throw to the spot anyway. Minutes later, you land big fish that took the fly from a spot where others would fear to tread.
That’s just one of the advantages of tying your own flies. That fly might not have taken more than a few cents of materials and a few minutes to tie so you had little to risk if you lost your offering. Store-shopping anglers, buying flies for a buck or more apiece (often more) might hesitate about casting a fly that might not come back.
Other than saving money, advantages of tying your own flies are that you can always tie in advance the flies that you need for a given trip, that you can custom tie anything that you like, and that you begin to explore the relationship of natural fish foods to the offerings that you tie and fish.
Related Articles:
-
Salmon Flies and Lures
-
Fly Fishing Tips: Dry Flies
-
Loop Line Fishing In Nepal
-
Best Carp Fishing Rods this 2021
-
The Brown Trout’s Eyesight: An In-depth Study
Proper Tools for Fly Tying; Important Materials
To do this, of course, you do need to make an initial investment in tools and materials and to learn the basics. Regardless of the type of tying that you will do (trout, bass, panfish, salt water, other) the basics are all pretty much the same. In turn, you will need:

Tools. These include, left to right: top row – simple tying fly vise. Second row, fine and coarse scissors. Third row, standard bobbin, Griffin adjustable tension bobbin and Merco adjustable tension bobbin. Fourth row, two types of standard hackle pliers, Griffin rotating hackle pliers and whip finisher. Fifth row, two bodkins. Sixth row, comb and bobbin cleaner. Seventh row, bobbin threader and dubbing loop tool.
• Vise – Special fly-tying vises hold the hook through cam or lever operated jaws. They come in two basic styles – one with a pedestal base to sit on a table and one with a C-clamp to clamp onto a table. The C-clamp type is more secure, but should not be used on expensive tables. Some vises have rotary cranks to turn the jaws for adding materials and viewing the fly from all sides, but these are not necessary for starting out.
• Hackle pliers – Hackle pliers are just what they say – spring-loaded pliers to grip hackle (a feather) so that you can wind it around the hook. Some now have a universal joint on a handle to make it easier to wrap a hackle without twisting it.
• Scissors – Special fly-tying scissors have large finger holes (necessary for most tyers) and fine pointed blades. For best results, get two – one with coarse blades for heavy cutting of fur and coarse materials, and one with short fine blades for delicate work such as trimming thread and hackle.
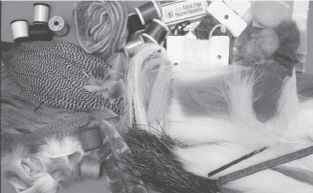 Some of the many materials used in tying trout flies. Left to right, top to bottom, top row: spools of thread, bundle of yarn, spools of floss, packages of chenille and packages of dubbing. Second row, hackle necks, teal and mallard feathers, stranded flash materials, synthetic streamer wing material, and marabou feathers. Third row, feathers, rabbit (Zonker) strips, spools of mohair, turkey feather, peacock herl, bucktail and foam strips.
Recommended Article: Essential Beginner Fisherman Gears
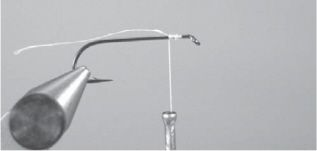
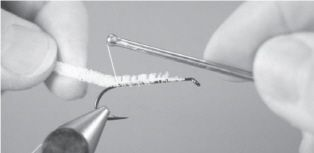
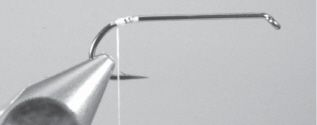 1.Beginning step in tying a woolly bugger. Tie the thread down to the hook just in front of the bend of the hook. Do this by wrapping the thread around the hook shank a few times, then crossing over the existing wraps.
- Bobbin – A bobbin is a spool holder with a tubular shaft through which the thread runs. They make it easy to apply the thread in a precise location and to control thread tension. The best have ceramic tubes or a ceramic ring at the end (like a guide ring) to prevent thread fraying. If making a variety of flies, get one with a long tube that will be easier to use on large flies.
- Bodkin – A bodkin is nothing more than a needle point on a short handle. You can buy them or make your own by inserting a needle, eye first, into a wood dowel or short handle. They are useful for adding sealer and head cement, pulling out hackle strands and other tasks.
- Light – A good light is a must, and special fly-tying lights are available. A small halogen light for hobby work or reading is ideal.
Materials for fly tying can be found in any fly shop or mail order fly-tying catalog. Basics include hackle or a neck (which has the hackle feathers), various tinsels, chenilles, yarn, nylon tying thread, peacock herl, bucktail and other furs, floss, synthetic materials, body fur, vinyl body materials, rubber legs, Mylar, and plastic foam. With these, in the many colors and sizes available, almost any style or type of fly can be tied.
While a fly can be tied on almost any hook, special fly-tying hooks are available from all the hook companies. These include hooks of regular length, some with longer than normal shanks for tying baitfish patterns, and those with bent shanks for tying scud and swimming nymph trout flies. Hump shank hooks are made for gluing into cork or balsa bass bug bodies.
Tying Techniques Apply To All Flies
The basics of tying flies are to tie materials, in sequence, onto the hook using special fly tying thread. Once the fly is complete, the thread is tied off with a special whip finish. Fortunately, the fundamentals for doing this apply to virtually all flies of all types for all species of fish.
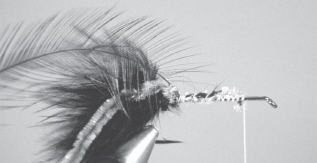
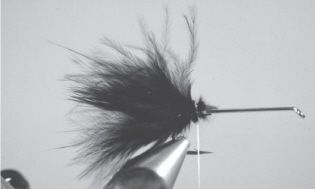 2.Next, clip a bundle of dark marabou and tie it down using the soft loop wrap as described in the text.
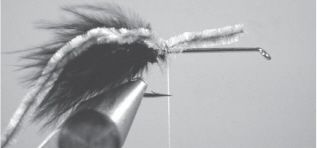 3.Following the tail attachment, tie in a length of body material. Here a length of olive chenille is being used. Other colors are possible.
 4.Following the body material attachment, tie down a hackle feather by the tip end as shown here with the purple hackle. Other colors are also possible.
 5.At this point, wrap the thread to the front end of the fly, tying down the tag end of the body material and the tip end of the hackle as shown here.
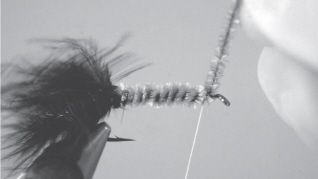 6.Wrap the body by winding the chenille around the hook shank as shown and then tie off with the thread at the front end of the fly.
Learn the basics of tying on, adding materials and tying off, and you can tie any fly for any fish. These basics are:
Placing the hook in the vise – Place the hook in the vise by opening the jaws (loosening the thumb screw or lever) and positioning the bend of the hook in the jaws. Close the vise jaws and make sure that the hook is not too loose.
• Tying on – Thread is “tied” onto a hook by a simple wrapping method. For this, hold the tag end of the thread, wind the thread around the hook shank for a few turns and then wrap at an angle to cover the previous wraps. It is this tension that holds the thread in place on the hook. Clip the excess thread and continue to tie the fly.
• Tying the soft loop to add materials – This is a standard method by which any material of any type can be exactly positioned on the hook. To do this, hold the material in place on the hook shank. Then bring the thread straight up and then loosely straight down on the far side of the hook. This technique keeps the material straight on the hook, without twisting, turning or cocking to one side. The easy way to do this is to grip the material with your left index finger and thumb (assuming a right-handed tyer), then bring the thread up, grip it between the thumb and finger, and then bring it down on the far side before pulling tight.
• Tying tails – Most flies, including wet flies, dry flies, some nymphs and streamers, have tails. These can be fur, feathers or synthetics. Use the soft loop method described above to add the tail to the fly at the junction of the shank and the hook bend. Clip any excess fur.
• Tying bodies – Bodies can consist of chenille, yarn, fur dubbing that is added to (“spun”) the tying thread, or tinsel. These are tied in one end of the hook shank, the thread wrapped to the other end and then the body wrapped until it is tied off by wraps of thread. Excess body material is clipped off.
 7.Continue this body by palmering (spiral wrapping) the purple hackle feather around the chenille body, as shown here.
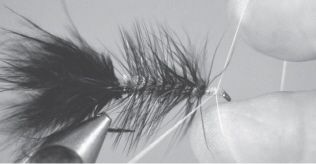
 8.Once reaching the head of the fly with the hackle, tie it off with the thread as shown here.
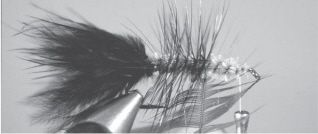
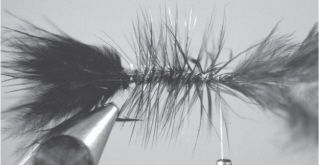
 9.Clip the excess hackle, then pull the hackle fibers back and out of the way to complete the head of the fly.
 10.Complete the fly by making a whip finish around the head, by wrapping loops of thread over and around the hook shank and the standing end of thread as shown here. Complete the fly, then seal with head cement or nail polish. (Note, in these photos, white thread was used for photo clarity and to differentiate from the other fly materials. Normally, dark thread to complement the dark fly colors would be used.)
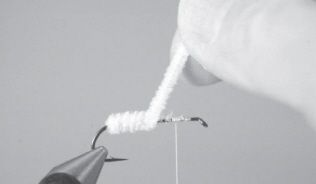
 1.To tie a simple streamer, begin by tying down the thread at the front of the hook shank by wrapping around the hook shank and then wrapping over it to secure the thread.
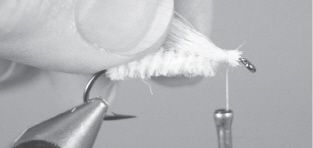
 2.Clip the excess thread, then tie in a length of yellow chenille. Then with the bobbin, wrap around the hook shank and the chenille until reaching the bend of the hook. Return the thread by spiral wrapping it to just in back of the hook eye.
 3.With the thread just in back of the hook eye, wrap the chenille forward by winding it around the hook shank as shown here.
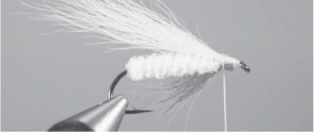
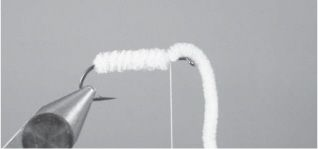 4.Continue to wrap until just in back of the hook eye, then tie off with the thread as shown. Clip the excess chenille.
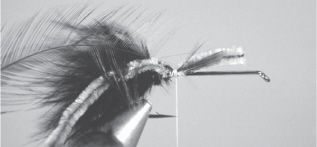
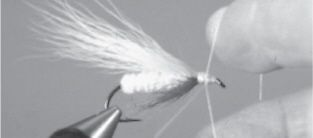
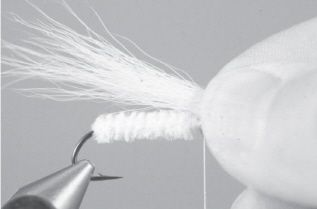 5.Cut and comb a length of bucktail, then hold it over the fly as shown to position it for the correct length. Generally, the accepted length for a streamer is about 1 1/2 to 2 times the length of the hook.
- Tying ribbing – Ribbing can be thread, tinsel, ribbon or other material that is tied in with the body and then spiral wrapped over it to make for flash or a segmented insect body.
- Tying wings – Wings on wet flies and dry flies are tied differently. Wet fly wings are tied from quills or feathers, with the tips facing to the rear and the wing tied at an angle. Dry fly wings are tied with the tips facing forward, and then brought to a vertical position by wraps of thread in front of the wing. Wings can be upright, divided (two wings, angled to the side) or spent (180 degrees, as with a dead insect).
- Tying hackle – Hackle is the fine feather barbules that are tied to surround the hook shank to make a fly stand up on dry flies, or angled to the rear to make for buggy legs on a wet fly or nymph. Tie hackle in by using thread to wrap in the butt of the feather, then use hackle pliers to wind the hackle around the hook shank. Tie off with the thread and clip any excess hackle. Throat hackle is tied differently, by adding a small bunch of fibers or fur beneath the head of the fly by tying using the soft loop method. Palmered hackle is hackle that is spiral wrapped up the hook shank over the body, as in spiral wrapping tinsel. A woolly bugger is a typical fly tied using this technique.
- Tying streamer wings – Steamer wings are tied on long shank hooks, after the body, ribbing and any tail material have been tied down. Wings are positioned immediately in back of the head. For this, use the soft loop method to secure the wing material straight on top of the hook. Some wings are multilayered with different materials or colors of the same material.
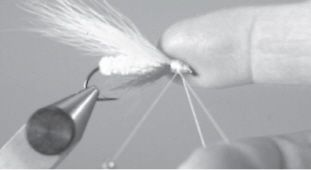
 6.Hold the wing by the end with the butts in position over the front end of the fly and tie down, making soft loop wraps with the thread. Secure with several wraps and clip any forward excess bucktail or fur.
 7.Use the same method to tie in a length of short red calf tail as a throat, directly under the wing of the fly. This small spot of color can simulate gills of a minnow, and help to provoke strikes.
• Making cork/balsa bug bodies – Cork and foam pre-shaped bodies are available for making floating bugs for bass and panfish. For these, use a regular long shank hook that is glued in place in a foam bug through a hole made in the bug belly. For cork, cut a slot in the belly and glue a hump-shank hook in place. Finish cork bodies with several coats of paint and then tie on a tail and hackle collar. Cork, balsa and foam can also be bought in cylinders and shaped with tools as you desire.
Learn to tie flies by practicing first the basic steps of fly tying, then tying simple flies such as streamers and woolly buggers on large size hooks. As your skills develop, try fly tying other flies, more complex patterns and start tying on successively smaller hooks. Consider also some of the many classes given by fly shops and fly fishing clubs, or get some personal instruction from a fly fishing friend who is an experienced tyer.
Developing this fishing hobby of fly tying will provide you with a great off-season activity, help you become a better fisherman by allowing you to throw your flies where others won’t and by helping you learn about the habits of fish, their foods and how flies work in the water.
 8.Finish by wrapping the rest of the area with thread to make a head of the fly, and then make a whip finish. Begin to make the whip finish by holding the thread in the left hand and using two fingers of the right hand to grasp the thread and fold it over the hook shank and standing part of the thread.
 9.Here the first loop has been formed by folding the thread with the two fingers over the hook shank and the standing part of the thread. If having difficulty with this, special easy to use whip finishers are available to make this task easier.
 10.Finish the whip finish after several turns of thread by holding the thread loop and pulling the standing end of the thread to pull the loop tight and secure the whipped “knot.”
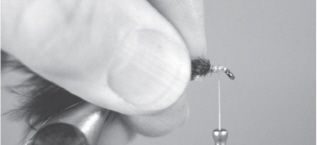
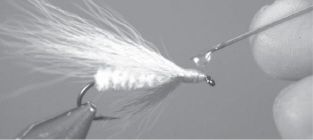 11.Here, the completed simple streamer is being completed by adding head cement or nail polish to the wrapped and secured thread head.


